Install Bearing Buddy: A Comprehensive Guide to Enhanced Trailer Hub Protection
Regular maintenance is crucial for ensuring the longevity and performance of your trailer. One key component that often gets overlooked is the wheel bearings. Bearing Buddy is an innovative solution that helps protect these critical components from premature wear and failure. In this article, we'll provide a comprehensive guide on how to install Bearing Buddy and explore its numerous benefits.
Benefits of Installing Bearing Buddy
-
Reduced Downtime: Prevents expensive repairs and replacements by extending the life of wheel bearings.
-
Improved Safety: Malfunctioning bearings can lead to brake failures and other hazardous situations. Bearing Buddy minimizes the risk of such incidents.
-
Lower Maintenance Costs: Eliminates the need for frequent repacking and servicing, saving you both time and money.
-
Enhanced Performance: Properly lubricated bearings reduce friction, allowing wheels to rotate smoothly and efficiently.
-
Increased Payload Capacity: By protecting bearings from wear, Bearing Buddy ensures optimal trailer stability and handling.
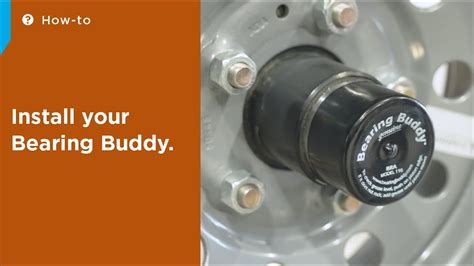
How to Install Bearing Buddy
Installing Bearing Buddy is straightforward and can be done in a few simple steps:
-
Prepare the Hub: Remove the old grease cap and clean the hub thoroughly.
-
Install the Housing: Position the Bearing Buddy housing on the hub and secure it with the provided bolts.
-
Add Grease: Fill the Bearing Buddy reservoir with high-quality wheel bearing grease.
-
Install the Grease Cap: Screw on the grease cap to seal the reservoir and protect the grease from contaminants.
| Step |
Description |
| Prepare the Hub |
Remove old grease cap and clean hub with brake cleaner. |
| Install the Housing |
Position housing on hub and secure with bolts. Torque to manufacturer's specifications. |
| Add Grease |
Fill reservoir with high-quality wheel bearing grease. Use a grease gun to apply pressure. |
| Install the Grease Cap |
Screw on grease cap to seal reservoir and protect grease. |
Success Stories
Installer testimonial:
"Bearing Buddy has been a game-changer for our fleet. We've seen a significant reduction in bearing failures and associated repair costs. The quick and easy installation process has also saved us valuable time." - John, Fleet Manager, XYZ Transport
Customer testimonial:
"After installing Bearing Buddy on my trailer, I've noticed a noticeable improvement in trailer handling and stability. The peace of mind it provides knowing that my bearings are protected is priceless." - Bob, RV Enthusiast
Sections for Each Story
Benefits
-
Quantify the benefits: Provide specific figures or data to demonstrate the impact of Bearing Buddy.
-
Emphasize safety aspects: Highlight the potential risks associated with bearing failures and how Bearing Buddy mitigates them.
-
Explain the economic advantages: Discuss the cost savings and return on investment associated with Bearing Buddy.
How to Do
-
Provide step-by-step instructions: Break down the installation process into clear, concise steps.
-
Offer helpful tips and tricks: Share valuable insights to ensure a successful installation.
-
Include troubleshooting advice: Address common difficulties that may arise during installation and provide solutions.
