Trailer Bearings Replacement: A Comprehensive Guide
Trailer bearings are essential components that play a crucial role in ensuring the smooth and safe operation of your trailer. They support the weight of the trailer and allow the wheels to rotate freely. Over time, these bearings can wear out due to friction, contamination, or improper maintenance, leading to performance issues and potential safety hazards. Replacing trailer bearings is a necessary maintenance procedure that should be performed regularly to ensure optimal performance and prevent costly repairs down the road.
Understanding Trailer Bearings
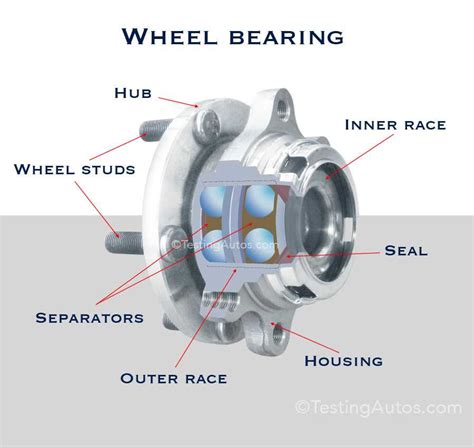
Trailer bearings are typically made of hardened steel and consist of an inner and outer race with a cage that houses the rolling elements, which are usually ball bearings or roller bearings. These components work together to reduce friction and allow the wheel to rotate smoothly around the axle.
The average lifespan of trailer bearings is about 20,000 to 40,000 miles, depending on factors such as the type of trailer, load capacity, and operating conditions. However, it's recommended to have your bearings inspected and replaced as needed every 10,000 to 15,000 miles.
Signs of Worn Trailer Bearings
Several signs indicate that your trailer bearings may need to be replaced:

-
Excessive grease leakage: Grease leaking from the bearing hubs is a common sign of worn or damaged bearings.
-
Grinding or squealing noises: A grinding or squealing sound coming from the wheels while driving can indicate worn bearings.
-
Increased wheel play: If the wheel has significant play or movement when you try to rock it by hand, it may be a sign of worn bearings.
-
Uneven tire wear: Uneven or excessive wear on the trailer tires can be caused by worn bearings that are not allowing the wheels to rotate smoothly.
-
Overheating: Worn bearings can generate excessive heat, which can lead to overheating of the wheel hubs and other components.
Replacing Trailer Bearings
Replacing trailer bearings is a somewhat involved procedure that requires specific tools and knowledge. If you are not comfortable performing this task yourself, it's best to have it done by a qualified mechanic.

Materials and Tools Required:
- Replacement trailer bearings and seals
- Bearing grease
- Bearing puller and installer
- Grease gun
- Torque wrench
- Locktite or similar thread locker
- Safety glasses
- Gloves
Step-by-Step Instructions:
1. Safety First:
- Park the trailer on a level surface and engage the parking brake.
- Chock the wheels opposite the ones you will be working on.
- Wear safety glasses and gloves to protect yourself from grease and flying debris.
2. Remove the Wheel:
- Loosen the lug nuts on the wheel that needs bearing replacement.
- Use a jack to lift the trailer and place jack stands under the frame for support.
- Remove the lug nuts and take off the wheel.
3. Remove the Old Bearings:
- Use a bearing puller to remove the old outer bearing from the hub.
- Pull the hub off the spindle and remove the old inner bearing.
- Clean the hub, spindle, and bearing seat thoroughly with brake cleaner or degreaser.
4. Install the New Bearings:
- Apply a generous amount of bearing grease to the new inner bearing and the spindle.
- Place the inner bearing onto the spindle and tap it into place using a hammer and a drift (or a bearing installer).
- Apply bearing grease to the new outer bearing and place it onto the hub.
- Use a bearing installer or a suitably sized socket and hammer to press the outer bearing into place on the hub.
5. Install the Seal:
- Apply a thin layer of grease to the new seal and place it onto the hub.
- Use a seal installer or a hammer and a drift to tap the seal into place.
6. Reassemble the Hub:
- Place the hub back onto the spindle and tighten the spindle nut.
- Install the washer and cotter pin.
- Use a torque wrench to tighten the spindle nut to the specified torque.
7. Install the Wheel:
- Place the wheel back onto the hub and tighten the lug nuts by hand.
- Use a torque wrench to tighten the lug nuts to the specified torque.
- Remove the jack stands and lower the trailer.
8. Test Drive and Grease:
- Take the trailer for a short test drive to check for any abnormal noises or vibrations.
- After the test drive, use a grease gun to inject bearing grease into the hub through the grease fitting.
Tips and Tricks
-
Use high-quality bearings and seals: Investing in high-quality bearings and seals will ensure longer lifespan and better performance.
-
Lubricate regularly: Regularly greasing the bearings will extend their lifespan and prevent premature wear.
-
Inspect bearings regularly: Visually inspect the bearings and seals for any signs of damage or wear during routine maintenance.
-
Replace bearings in pairs: It's recommended to replace bearings in pairs on the same axle, even if only one bearing shows signs of wear.
-
Use a torque wrench for proper tightening: Tightening bearings to the correct torque is crucial to ensure proper operation and prevent damage.
-
Consult the trailer manufacturer's manual: Refer to the manufacturer's instructions for specific torque values and bearing sizes for your trailer.
Common Mistakes to Avoid
-
Using incorrect bearings: Installing bearings that are not the correct size or type for your trailer can lead to premature failure.
-
Over-greasing bearings: Over-greasing can cause excessive heat and pressure buildup, leading to bearing failure.
-
Using contaminated grease: Using grease that is contaminated with dirt or debris can damage the bearings.
-
Installing bearings improperly: Improper installation can damage the bearings or cause them to fail prematurely.
-
Ignoring bearing noise or vibration: Continuously driving with worn or damaged bearings can lead to severe damage to the trailer and safety hazards.
-
Neglecting regular maintenance: Failing to regularly inspect and maintain bearings can significantly reduce their lifespan and increase the risk of failure.
Frequently Asked Questions (FAQs)
1. How often should trailer bearings be replaced?
Trailer bearings should be replaced every 10,000 to 15,000 miles or as recommended by the trailer manufacturer.
2. What are the signs of worn trailer bearings?
Signs of worn trailer bearings include excessive grease leakage, grinding or squealing noises, increased wheel play, uneven tire wear, and overheating.
3. Can I replace trailer bearings myself?
Replacing trailer bearings is a somewhat involved procedure that requires specific tools and knowledge. If you are not comfortable performing this task yourself, it's best to have it done by a qualified mechanic.
4. How much does it cost to replace trailer bearings?
The cost of replacing trailer bearings varies depending on the type of trailer, the number of bearings being replaced, and whether you choose to do it yourself or hire a mechanic.
5. What is the lifespan of trailer bearings?
The average lifespan of trailer bearings is about 20,000 to 40,000 miles, depending on factors such as the type of trailer, load capacity, and operating conditions.
6. Can I grease trailer bearings too much?
Yes, over-greasing trailer bearings can cause excessive heat and pressure buildup, leading to bearing failure.
Conclusion
Replacing trailer bearings is an essential maintenance procedure that ensures the safe and efficient operation of your trailer. By understanding the signs of worn bearings, following the step-by-step instructions in this guide, and adhering to the tips and tricks provided, you can confidently perform this task yourself or provide informed oversight to a mechanic. Regular bearing maintenance will extend the lifespan of your trailer and prevent costly repairs down the road.
Remember to consult your trailer manufacturer's manual for specific instructions and torque values related to your trailer model. Happy and safe trailering!
Table 1: Trailer Bearing Types
| Bearing Type |
Description |
Advantages |
Disadvantages |
| Ball Bearings |
Use small, round balls as rolling elements |
Lower friction, higher speed capability |
Less load capacity, more prone to wear |
| Roller Bearings |
Use cylindrical or tapered rollers as rolling elements |
Higher load capacity, longer lifespan |
Higher friction, lower speed capability |
| Tapered Roller Bearings |
Use tapered rollers as rolling elements |
High load capacity, can handle axial loads |
Complex design, require precise adjustment |
Table 2: Signs of Worn Trailer Bearings
| Sign |
Description |
Potential Cause |
| Excessive grease leakage |
Grease leaking from the bearing hubs |
Worn or damaged bearings, damaged seals |
| Grinding or squealing noises |
A grinding or squealing sound coming from the wheels while driving |
Worn bearings, lack of lubrication |
| Increased wheel play |
If the wheel has significant play or movement when you try to rock it by hand |
Worn bearings, loose spindle nut |
| Uneven tire wear |
Uneven or excessive wear on the trailer tires |
Worn bearings that are not allowing the wheels to rotate smoothly |
| Overheating |
Worn bearings can generate excessive heat, which can lead to overheating of the wheel hubs and other components |
Lack of lubrication, worn or damaged bearings |
Table 3: Tips for Trailer Bearing Maintenance
| Tip |
Description |
|
Regular inspection: Visually inspect the bearings and seals for any signs of damage or wear during routine maintenance. |
|
